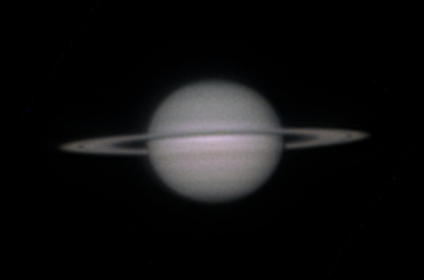
Thought I would get out for another evenings observing. Visibility appeared to be good around 8pm and improved as the evening went on. Still finding it challenging with the very side on nature of Saturns tilt with respect to viewing from Earth.
Still seeing a hint of the Cassini division but also now seeing a slight shadow of the face of the planet caused by the rings.
I hadn’t been too excited to image Saturn this season due to the angle on which we will be observing. But I thought as we approach opposition on 8th September that i should get the telescope out and give it a go. In the end I was pretty happy with the result after post processing in Autostakkert and waveSharp.
I am sure that I can see a hint of the Cassini division.
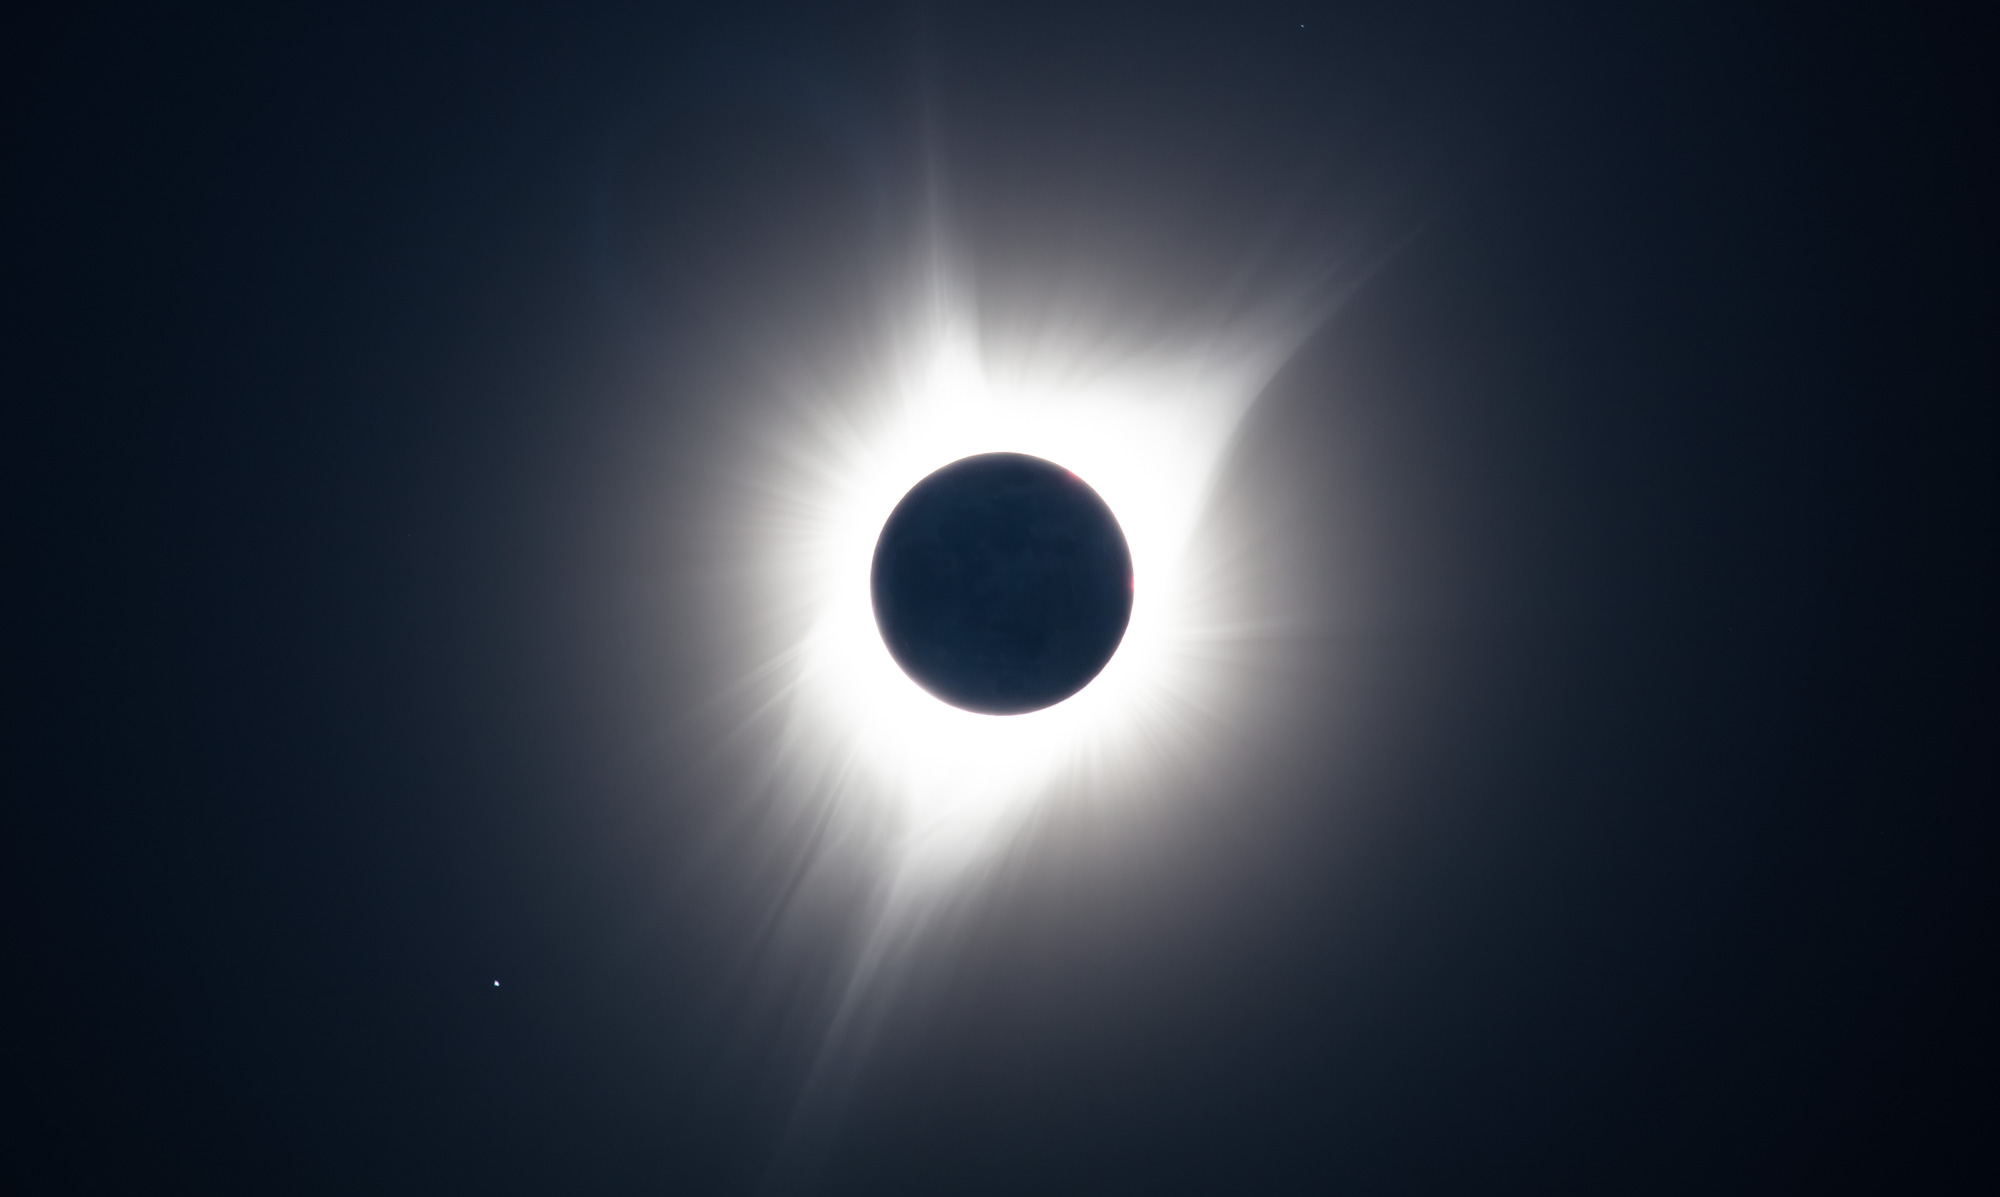
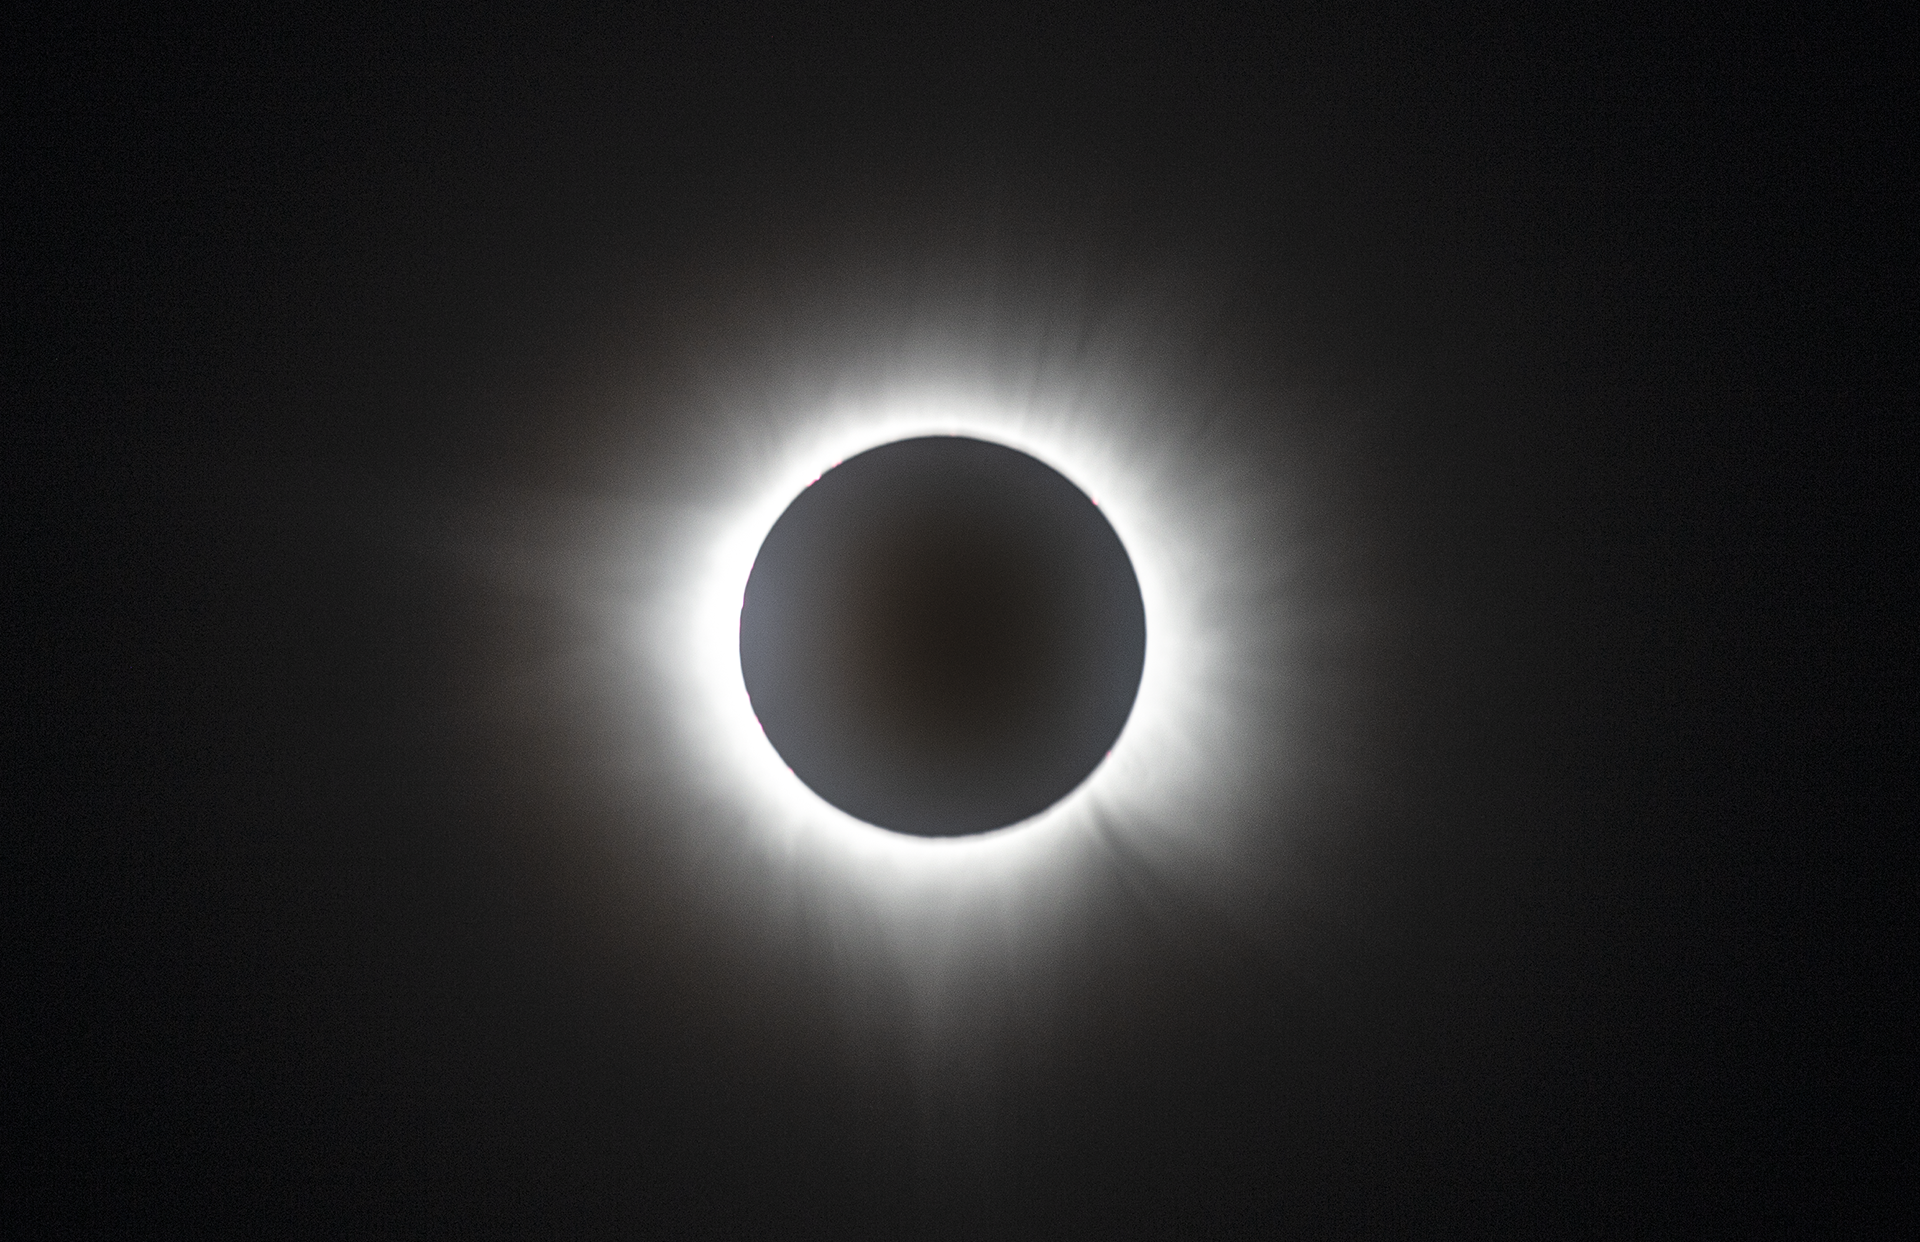
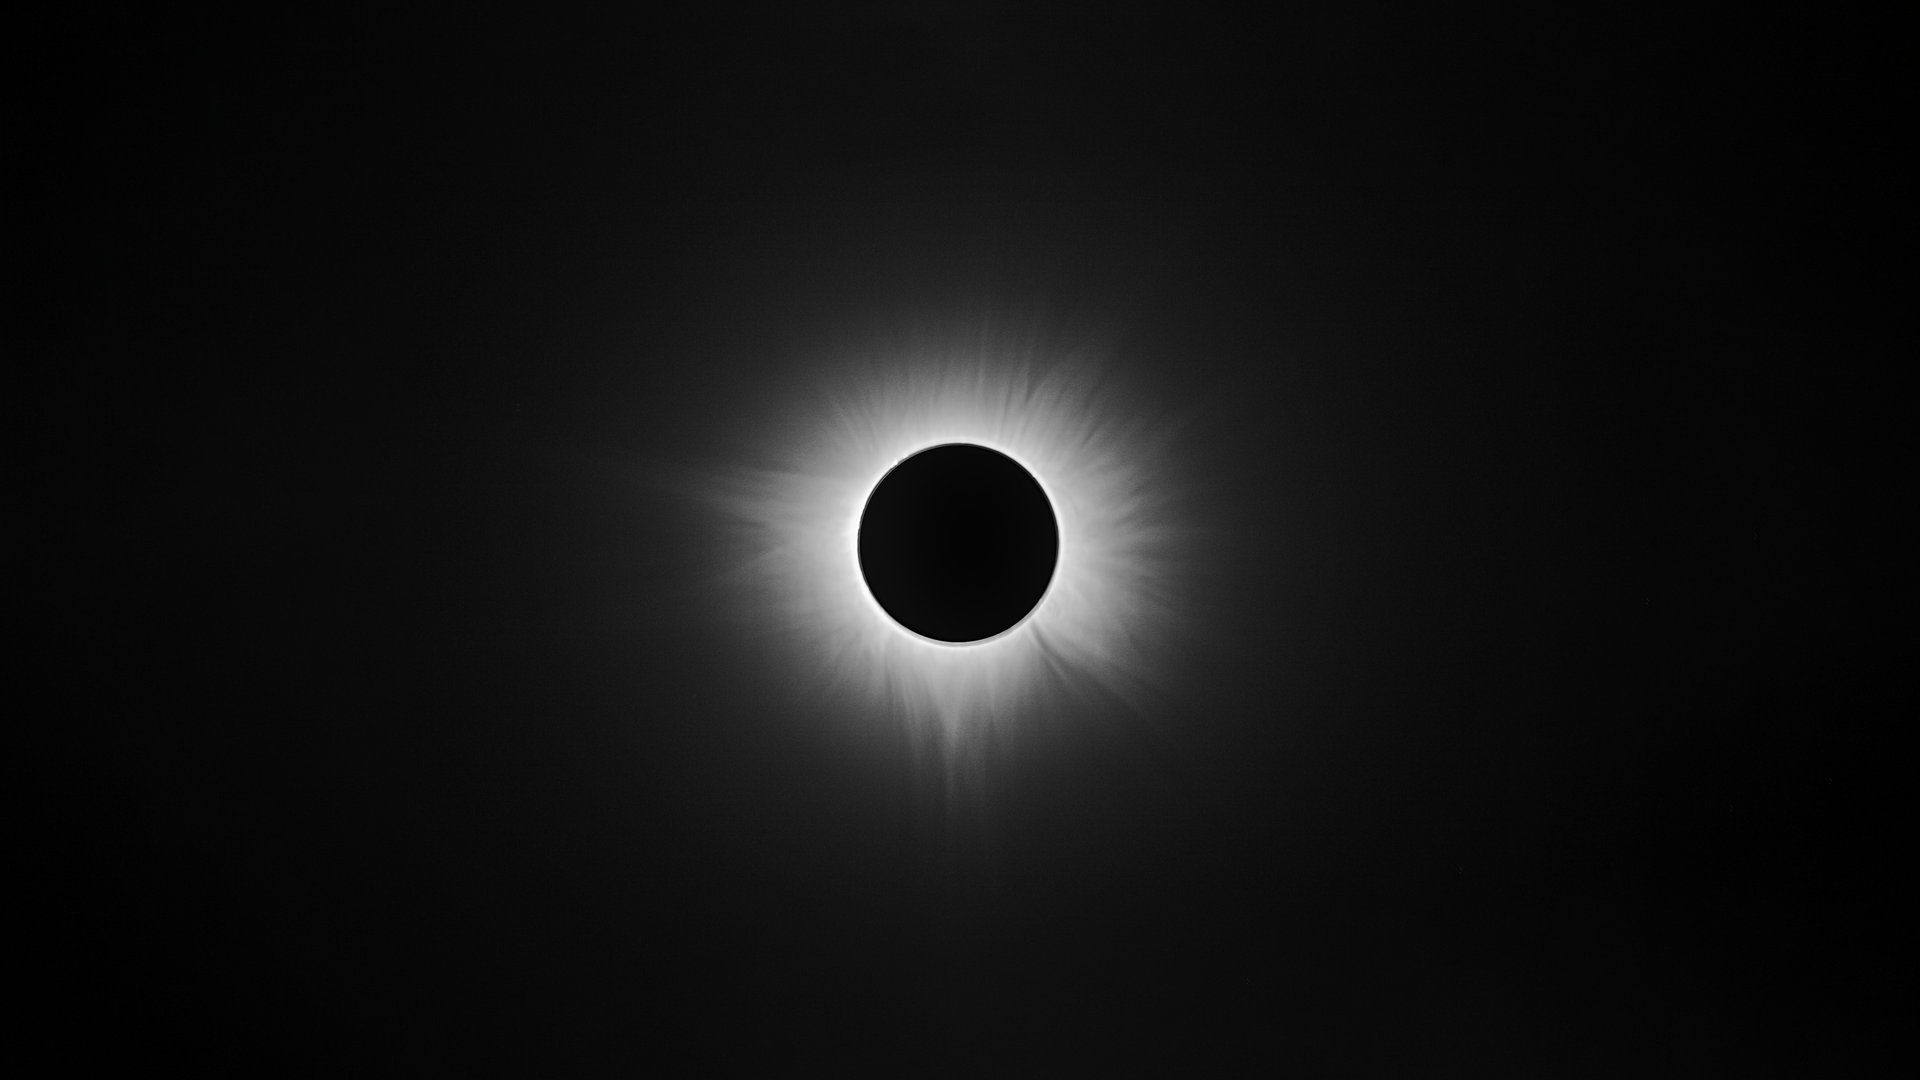
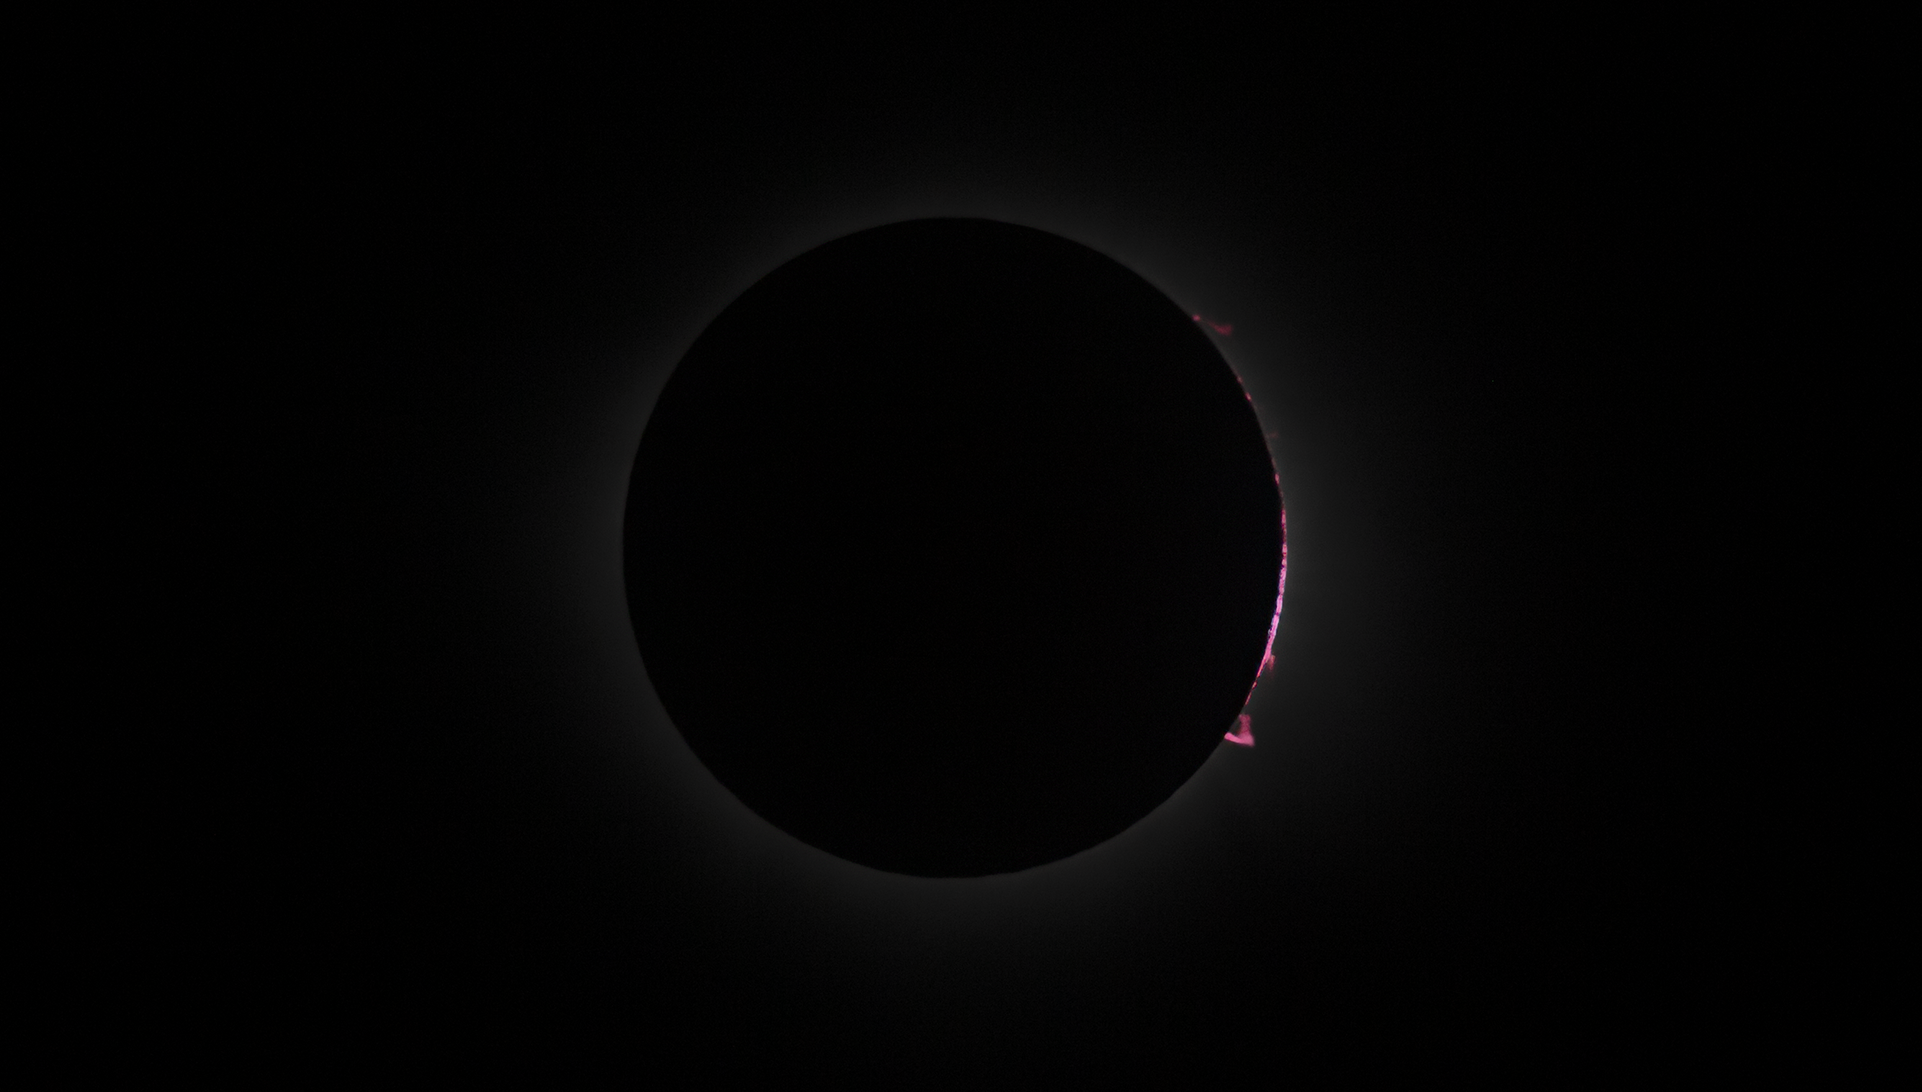
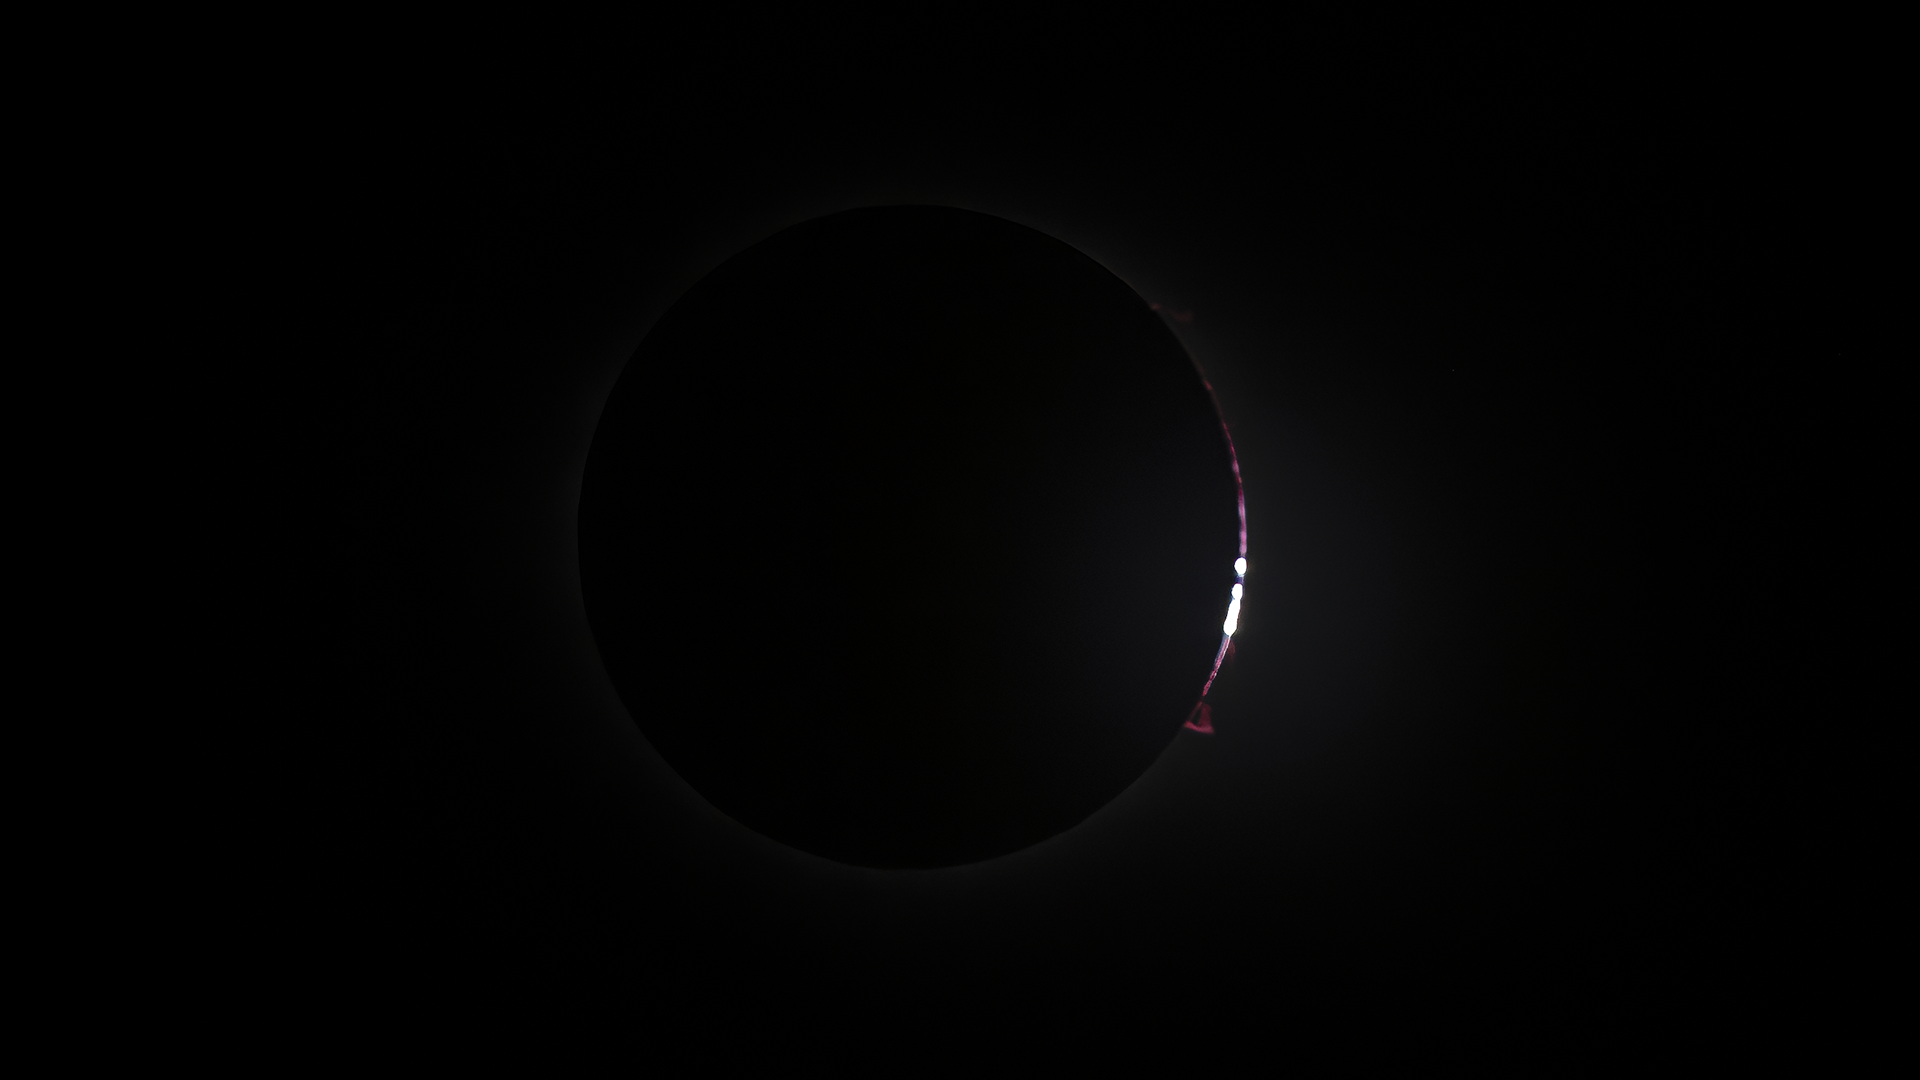
With another total solar eclipse occurring in the US in 2024, there was no good reason why I would miss it. Planning for the eclipse started about a year out focusing firstly on an ideal location. With the path of totality running from the west coast of Mexico then through Texas and onwards to the north east of Canada.
I consulted the following website that provided a wealth of information around the best places to observe based on historical weather patterns. We settled on Texas as I could fly into Dallas Fort Worth and then meet up with some friends making the journey from New Jersey.
But where in Texas? We settled on a small town called Burnet that was only a small distance from the centre line.
The website provided by Xavier Jubier was pivotal in assisting us in making the decision, which would mean we would experience 4 minutes 27 seconds of totality.
In the days leading up to the eclipse we nervously consulted the weather forecasts and it looked like we would be dealing with some cloud cover. This was going to similar to the circumstances with the TSE in Alliance Nebraska. We decided that we weren’t going to chase clear skies simply take what the weather gods provided.
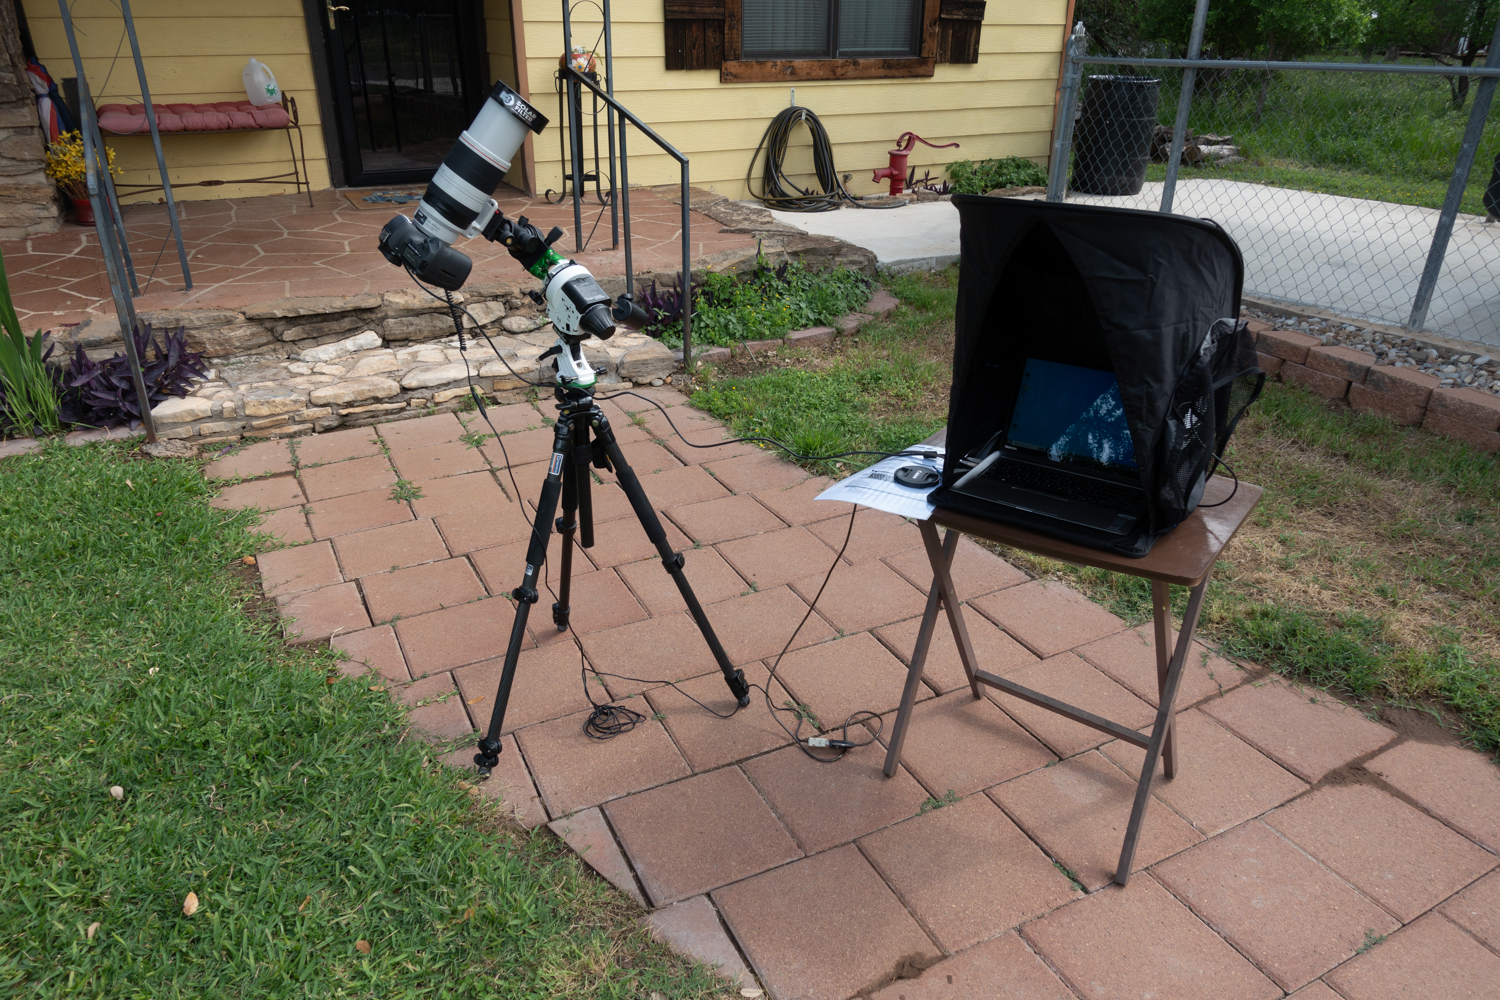
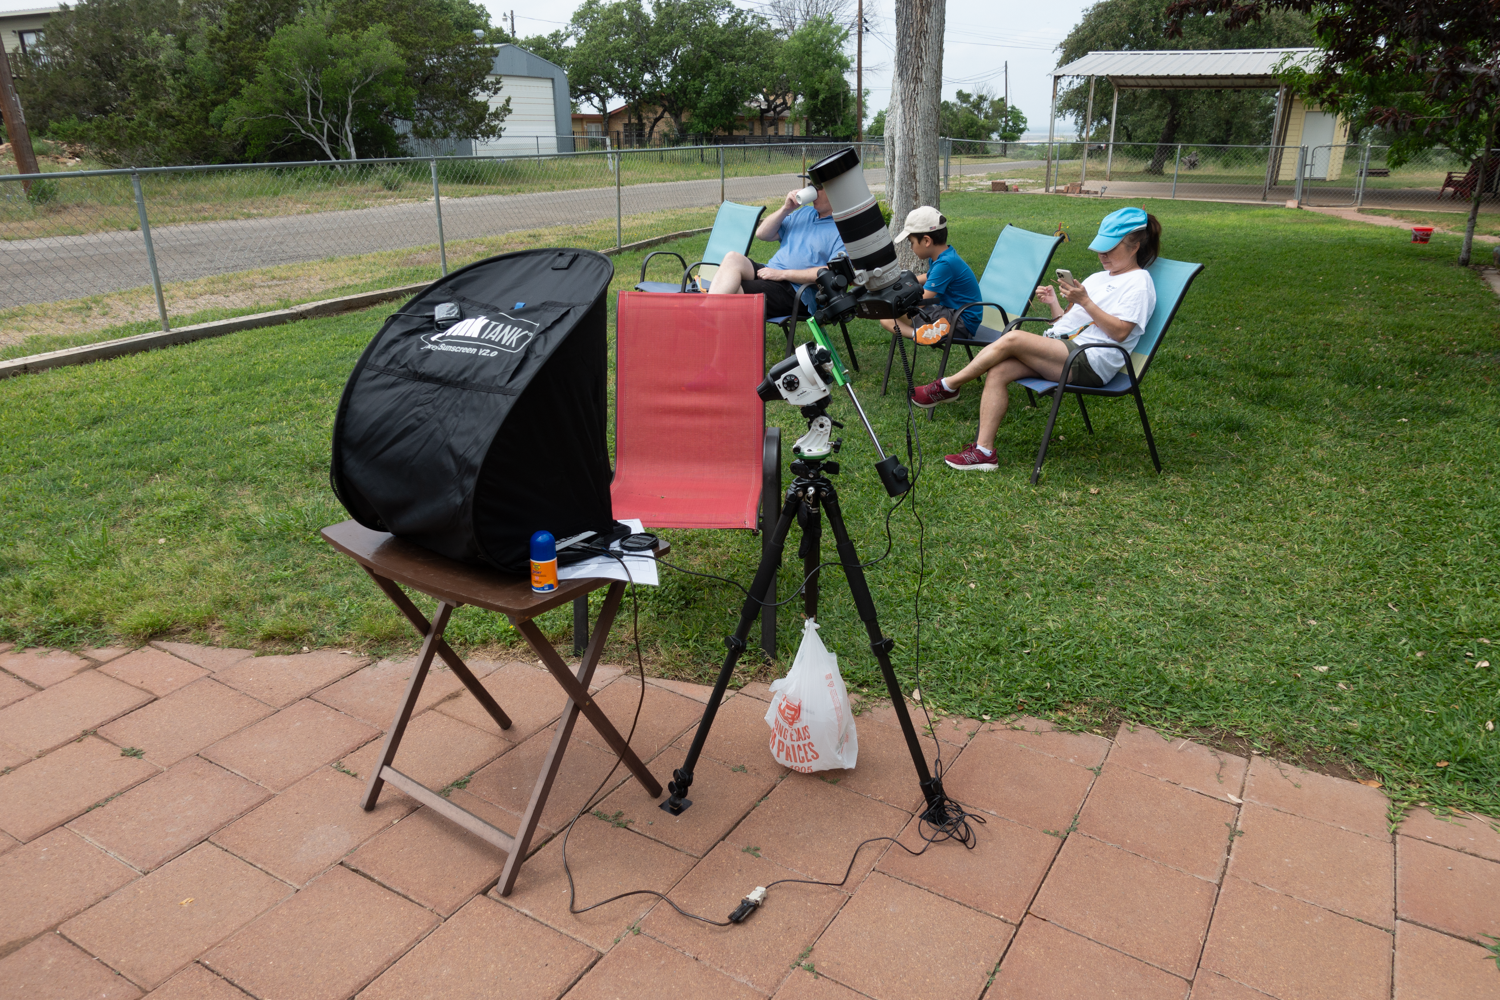
The day of the eclipse was similar to that of the days leading up with scattered cloud in amongst periods of bright sunshine. I setup in the early morning and waited for first contact of the moon passing in front of the sun that would start just after lunch.
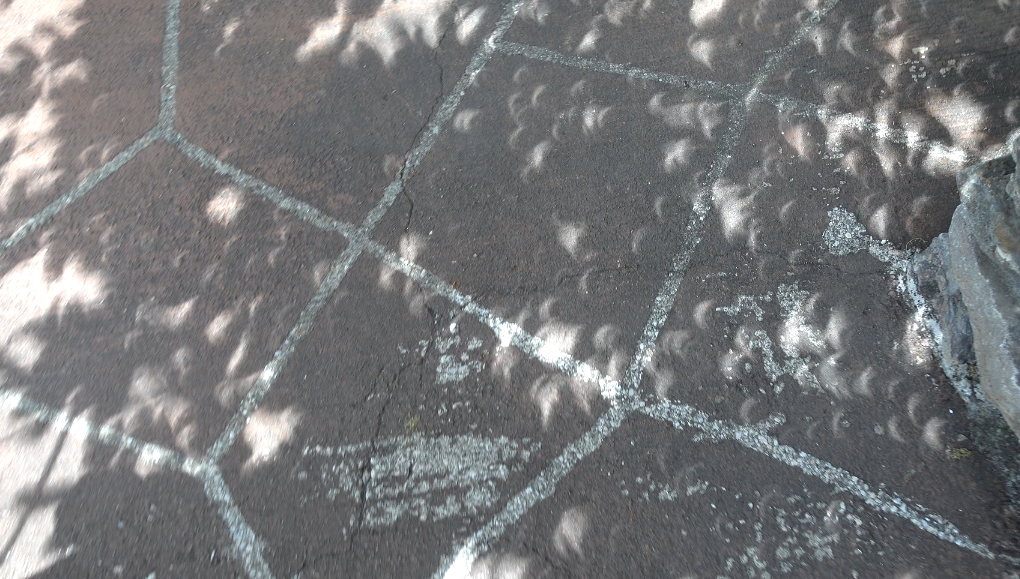
Peter, Ragnar and Maggie nervously waiting.Crescent shaped shadows
Five minutes out with the darkness fast approaching the cloud cover appeared to get less and less. There was one last group of clouds covering the sun and we could tell that there was enough time for it to pass and that we would have unobstructed views. We were all so very happy.
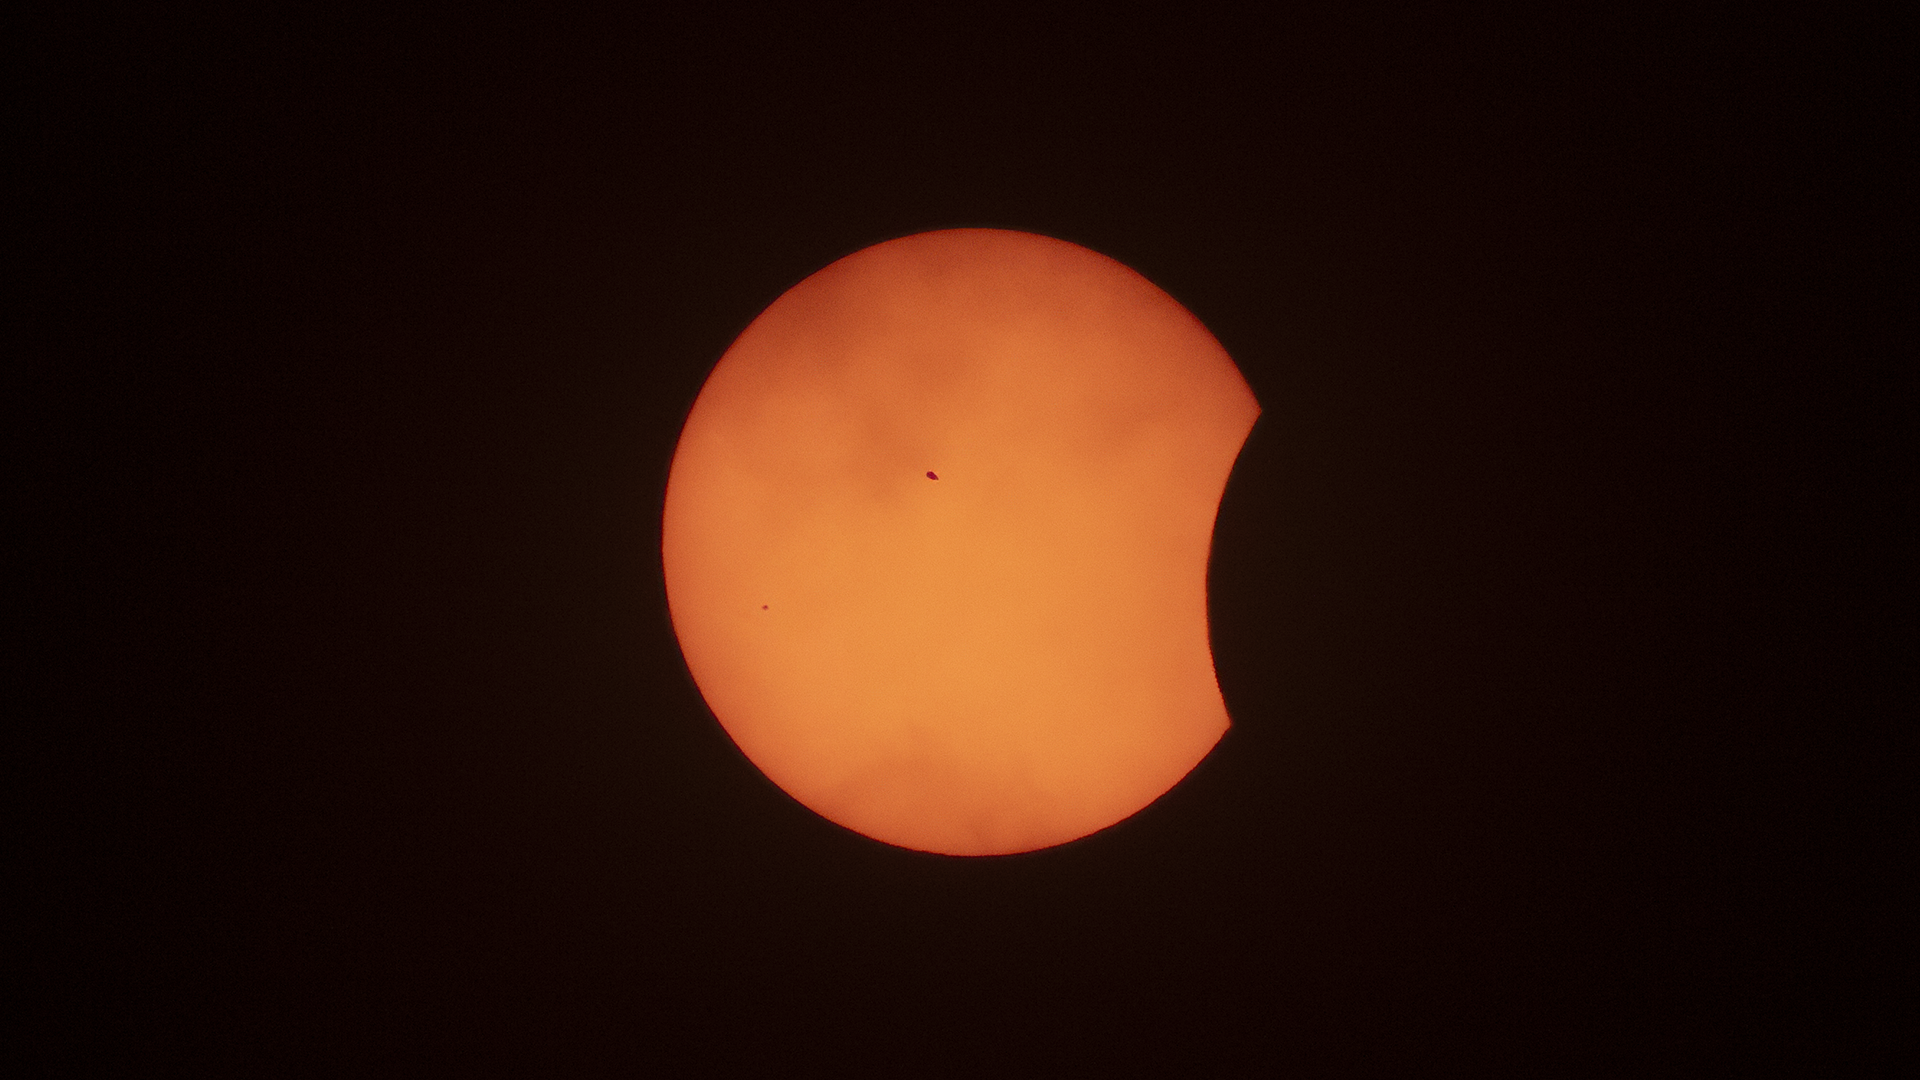
Even though totality lasted for the four and a half minutes it was over way too quickly. By the end of it, high level cloud was beginning to cover the sun and moon blowing out the observation of the final diamond ring at C3.
In terms of the final pictures I was not as happy as previous observations. Not sure if it was down to the thin layer of cloud or a slightly out of focus camera setup though I was able to pull together the following images from the main event. Click the image to load a larger version.
ContactTotalityComposite image of totalitySolar prominenceBaily’s Beads
Other links of interest include the following site that predicts what the structure of the suns corona during totality.
We are about a week past opposition with Jupiter and was my first opportunity of this season to get out and check out Jupiter. Whilst Jupiter has been prominent in the sky some some time it was obscured by my neighbours house and the weather in Sydney hasn’t been kind this spring.
After checking the MetroBlue Astronomy Seeing for Sydney earlier in the day I could see that it would be an excellent opportunity to get some observing done. I first started with Saturn as it is high in the sky mid/late evening with Jupiter getting into a better position from about 11pm.
After performing a quick stack I could see the results were going to be pretty good so I decided to do about 90 minutes of observing taking 60 seconds of video followed by 30 seconds delay.
The following animation below is the result and am quite pleased even though the clarity of the image softens towards the end as I hadn’t turned on my dew heaters and only noticed when I was packing up.
You can clearly see Jovian moon Io and it’s shadow transits the face of Jupiter. A beautiful site.
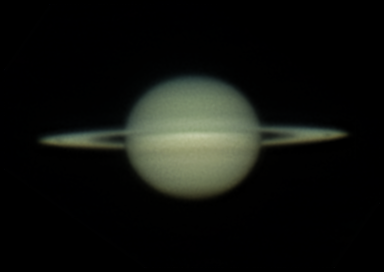
Off the back of last Saturday nights success with imaging I thought I would give it another go. The astronomy forecast for seeing/visibility was very promising so after setting up and getting my first views of Saturn in I knew that the results were going to be far better.
I am very happy with the processing and getting the clarity in the Cassini division. Just so tricky with the side on view of the rings that we are having this season. Can’t wait for a couple of years from know when we have better visibility on the ring plane.
Didn’t have much luck observing Saturn around opposition and when I did my dedicated astro-pc (Intel-NUC) decicde to burn itself out. After purchasing a second hand Dell OptiPlex Mini I am back in the game. Actually I think this is going to work out even better as it has 6 USB ports over the Intel-NUC’s 4 USB ports.
Now in terms of doing some observations I thought that it might be challenging with all the heat that Sydney has been experiencing. But in the end it didn’t turn out too badly in the end. Cassini Division definitely noticable still given the angle we are currently seeing Saturn at.
For any given location on Earth, a total solar eclipse will occur on average once every 360 years. And for parts of Australia and New Zealand it will be their turn on Saturday 22nd July 2028.
To provide some idea what 4 minutes of darkness would look like, I decided to created a composite image of the event combining it with one of the most iconic scenes known across the world, that of the Sydney Opera House and the Sydney Harbour Bridge.
Composite image of the 22nd July 2028 as viewed from Farm Cove
Creating an accurate composite
So you are probably asking yourself, how accurate can this image be 5 years out from the event even occurring? Well I must admit I can’t predict the weather and that will truly be in the hands of the gods on the day. But I’ve tried to make everything else in this shot as accurate as possible.
Let me take you through the process.
Planning the shot
The first tool that I used was Sun Surveyor on my iPad. This allowed me to determine the location of where the Sun and Moon will be and then looked at the best spot to start planning out where to take a photo from. It was pretty obvious that a location in the Royal Botanic Gardens was going to be ideal with uninterrupted views across Farm Cove.
Using Sun Surveyor on iPad to plan the shot
Taking the shot
Next step was to take some photos down at Farm Cove in roughly the same position as Sun Surveyor. It was just a matter of utilising the live augmented view to ensure that I had the framed the shot and included the patch of sky where the Moon and Sun would be.
And this is the beautiful thing about using the tool, being able to set the date/time five years into the future.
Augmented live view using Sun Surveyor on iPhone
I captured a number of pictures across a variety of shutter speeds to ensure that I had captured some additional stars and planets. These would later act as reference points in post production.
Post productionworkflow
On reviewing the 40 or so pictures that I had taken I settled on the one that had what I felt was the right exposure along with some visibile starts and planets.
The next tool that I planned to use was Stellarium an open-source planetarium. Similar to Sun Surveyor, it also works by utilising your Earth based co-ordinates and either current or user specified date/time to display to display what the sky would look like. It was then just a matter of grabbing some star fields, one for when I took the original photo and the second for 22nd July 2028 @ 2.01pm AEST.
Then it was over to Photoshop to do the following.
Add original image as background layer
Add star field image for current date/time as a new layer
Add star field image for 22nd July 2028 as a new layer
Position, rotate and scale star field layers to align to stars and planets on original image
Remove existing stars from original image background layer
Add image from August 2017 total solar eclipse as a new layer
Position and scale August 2017 total solar eclipse image layer to align with camera lens of original image
Add planet to represent Mercury position at time of eclipse
Add star to represent Pollux position at time of eclipse
Final tweaking of the image was then performed in Lightroom.
Apply linear gradient to have a darker sky to represent the umbra (total eclipse) on the right hand side of the image, whilst the left hand side is lighter representing the penumbra (partial eclipse).
Final thoughts
I’m delighted with the final product. It’s by no means perfect and assumes that the weather will be kind to observers on the day.
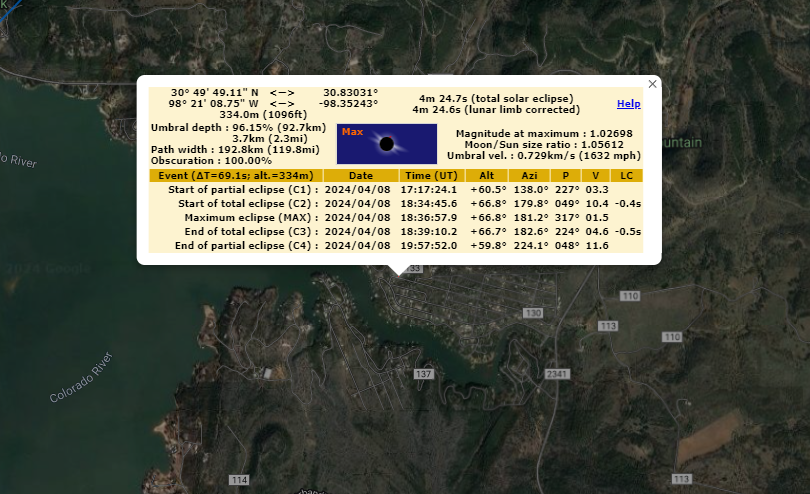
If you are interested in learning more about the path of totality then I highly recommend this interactive Google Map.
Every now and again the positions of the planets in the night sky appear to align themselves, but in reality it is just their orbits in the ecliptic plane around the sun. And this time we were treated with two of the brightest planets, Jupiter and Venus.
I was very pleased with how this photo turned out. The planets were both low in the western sky along, Jupiter top left with it’s moons out to the right hand side. Venus shining brightly in the lower left.
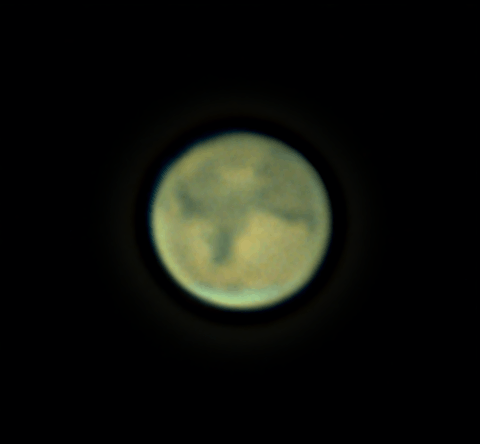
It certainly has been a challenging time trying to get in some observation on Mars at it experiences it’s closest approach. I was however able to get the following a night or two of observing and was able to put together this animation.
Certainly had one of my best evenings observing Jupiter. Starting at about 9pm the visibility in the sky was quite amazing and i knew that I had to make the most of it. The image below turned out to be the first image that I was able capture. One of Jupiter’s moons is out to the right and projecting a shadow onto the surface..
Combining a stacked and processed image I was able to create the following video.